Friday, May 20, 2016

How did you tell the girls?

Luckily, I guess, a couple of weeks before the big news fell - if you don't know what I'm talking about, you might want to read my previous post - we had played the Powerball. The jackpot was evaluated to several hundreds of millions. We didn't win. But we had time to dream about what we would do if we would win. As a family, including the girls in the process, we had decided that we would have them drop school and we would leave for a trip around the world. A couple of years. The girls were pretty excited about that. We would keep the house so we could come back in two, three years. (And then we would build a slide from the 2nd floor of the house leading into our swimming pool...but that's a whole other story...)

So as I said, we didn't win. But. But. When came the time to break the big news to the girls, we came back to this:

"Remember we had said, if we won the Powerball, we would quit school and leave for a trip around the world? Two, maybe 3 years? How does that sound?" 

"Yaaaaaaaaaaaaaay!" 

"Mom? Are we really going to do that?"

"I don't know yet. We have to discuss it with daddy. He has to tell his company that he wants to leave..." 

Ho boy. What did I put myself in?

So that evening we told them that yes, we were leaving. That we would find a school for them in Europe, in the middle of all the beautiful countries we were planning to visit. They agreed. It took like 5 minutes and it was done. No tears. Just excitement. Until it was time to go to bed... 

I got a couple of worried questions from Maya first. But she quickly fell asleep.

And then I got questions + tears from Arielle. It lasted, what, maybe 1 hour?! Poor little girl. She wasn't sure anymore that she was willing to leave her house behind. And her friends!!! What would they do without her when she would be ON THE OTHER SIDE OF THE WORLD? She fell asleep, exhausted!

We told them not to tell their friends just yet. I know, it was a bit much to ask. 
Arielle did tell her friends but somehow they didn't seem to realize anything and didn't bring the news any further. 

We told the teachers. We started applying for our new school. An International School following the American curriculum. Perfect to keep the girls on track because yes, it's the goal to come back to the US. 

No more tears were shed. 
And a couple days later, as we were driving to school, Arielle asked me:

"Mom, dad got transferred didn't he?" 

She knew...

1.5 months later, that would be now, we are not crying anymore. Or at least they are not. ;) We are trying to get everything together and ready, while finishing our things here and continuing to live normally, as much as possible. 

The worst part is being separated from daddy whose already working and living in Prague.

I asked the girls what they wanted for their birthday. Maya said she wanted to be standing next to Daddy, Mommy and Arielle. That's all. 

We'll do that little girl. We'll do that.

Tuesday, May 17, 2016

"Are you sitting down?"

It was mid-January, 2016.

My husband called me.

Him: "Are you sitting down?"

Me: "Why? Are we moving?"

Him: "Yes."

Me: "Where?"

Him: "Are you sitting?"

Me: "Not Europe?!!!"

Him, laughing slightly: "Yes."


...


And so it began.


"Where?"
"Not Switzerland?!!"

"No."

"You're sitting?"

"Yes. I am."

"Prag."

"What?!!"

"Prag."

"You're kidding me."

"No."

"When?"

"Soon."

You can feel my excitement, can't you? After the 12 years I had done in Switzerland, I had made it clear that I was not going back. Not to Switzerland anyway. But it wasn't really a choice. When the company you are working for has a job for you, you take it. No matter what. So this was Friday. They gave us until the following Monday to give an answer. The discussion that weekend was quick: So? Do we do it? ... I think we don't have the choice, do we? ... No, not really. ... Ok. Let's do it.

After that, we waited 2 long weeks. Everyday I would ask him if he heard anything. "No."
Until one day he said: "I'm going to Prague for interviews."

"When?"

"In 3 days."

There's never a lot of time to think. Once the process starts, you're just pushed left and right as it pleases them. So I stayed home alone with the girls. Almost one week. He had many interviews! When he came back, he had 3 days with us and he left again, to Florida, for more interviews. He also had interviews by phone. 13 in total. And then we waited. One week without news. And then he got one more interview. And we waited again. One more week. And then it fell: He was chosen! We were going to Prague!

That was the end of February.

So all that waiting + interview time lasted 1.5 months. We didn't tell our girls. In fact, we didn't tell anyone. We didn't want to risk the girls to be sad for nothing. When we knew it, we still did't tell the girls. We had no details, no action plan. We did't know when we would have to go. We knew that I would finish the school year here. My husband would have to leave before that for sure. We were another 4 weeks without knowing anything. And then Pat had to go to Prague for a week. That was the end of March.

Because his trip was only for a week and because he hadn't heard anything yet, we thought we were good until the beginning of May. But then it happened: just a day before he left for that week in Prague, the phone rang and it was the details we were waiting for: you're beginning in Prag, April 1st.

It was scary. That meant we would be separated April to July. That meant I would have to manage the girls + the move by myself. Selling the cars, the packing of the house.... I didn't think I could do it. So Pat arranged to come every 3 weeks for some days, starting mid April. Phew!!

Before he left (or after he came back from his first week in Prag), we went to Atlanta to renew the kids passports. And he booked a hotel/apartment he would stay at until mid-july. And then he left. It was mid-April.

The first three weeks went pretty fast. Living alone with the kids is not easy. That's when you realize that the things you leave aside for when hubby comes home that night can't be left aside because hubby is NOT coming home that night. Nor the next one, or the following one. The nights are dark and scary. Thank god for good neighbors and friends we can count on!!

Thankfully, nothing really bad happened. Nothing I couldn't do by myself (with his help at the end of the telephone line). The worst part was taking care of the pool. Yuck! Remember we live in the south. I'm always afraid of going in the bushes for the filter tasks because of the snakes and spiders. Ha! Apparently there are no bears, no snakes and no spiders in Prag. Nobody got sick either. I sometimes get migraines and then nothing goes. But no, nothing bad happened.

While Pat was away, we learned that the contract had changed (expat contracts are always the same, so we more or less knew what to expect) and that we had to put our house on the market for rent. Another big stress. You would think that when the company moves you, they take care of everything? Well you would be surprised! So from overseas and while working long hours on a new job in another country, hubby took care of that. We were lucky and found good people right away!

Pat came back and stayed with us 5 long (I'm kidding!! It went really fast!) days. On the 4th day, my parents arrived. They would stay at our place for 10 days while I would go to Prag with Pat on a house hunting trip.

We had our house hunting day yesterday. We chose a house out of the 8 houses the agent had to show us. We are now waiting for a contract. Today is Tuesday. I'm still here for a couple of days, until the weekend, and then I go back home, to my little girls. Pat is working. Today he was in Poland! I spent the day alone, strolling Prag, taking pictures, checking my pockets and eating in restaurants. Make sure you follow me on Instagram if you want to see my pictures. That's where the fun is! :)

Instagram: @mpcapistran

I'll come back with the rest of the story as it unfolds.
Thanks for tagging along!! I really love the support!

Marie

Saturday, May 14, 2016

Citrus Twist Kits DT | Project Life

Hi everyone!

Today is a special day. I'm going to take little break for the summer while we are moving so this will be my last project for Citrus Twist Kits for a little while. And it's a very simple one.

You might know if you follow me since January, that every month I like to add a little calendar between my pocket pages.  And then, on the back of the calendar, I fill the pocket with a small page (6x6). I like to take a special photo. There's not much space for the journaling most of the time. I have to be clever about it so that it tells a story with very little words. So here is my April calendar and 6x6 page:


I made my calendar myself at the beginning of the year I used Photoshop and it was fairly easy. It just took some time.


I added a flair and a small round sticker and I used my agenda to fill in the days.


For the little page I used a photo that I had printed for my PL and that I had left out. because it was my daughter attending a birthday party and I thought it doesn't have to be in the album - I'm trying to make it simple and catch up before I leave! So anyway, my husband came into my studio and said: "Wow! That,s such a cool picture!" I mean, the lighting in that place was crappy, I don,t know the little girl who's on the picture with my daughter... the picture is blurry, but apparently it spoke to "daddy" so I decided to use that photo! :)

Because of the very small size of the page, I kept the embellishing to the minimum. And didn't add much journaling except the infos about the event, but this being said, I love this picture a lot because my daughter came a long way on the social point of view since the beginning of her kindergarten year. When we came to our first birthday party at this place at the beginning of the year, she hung up to my leg and didN,t play. And now she's sliding the giant slide and really having fun (as the picture tells). So I added a little #go maya go to represent that. I could add a 3x4 card and write the details and tuck it inside the page protector. I might do that. :)


So voilĂ ! That's it for today!! 
I hope you got inspired by my little project even though it was small and simple. I'll have one last page to show you (for Get it Scrapped) before i leave for the summer so stay tuned for that! :)

Talk to you soon, friends!!

Marie

Thursday, May 12, 2016

Citrus Twist DT | Project Life May 2016

Hello everyone!

I'm here today to show you another Project life page I made with my Citrus Twist Kits Project Life May 2016 kit! :)


The May kits colors are right up my alley!!! Look at this: yellow, pink, aqua and a lime green. It fits right with my life. :)


The 6x6 paper pad is from Page Evans' Fancy Free collection.  Yummy colors. Really!!! I used that circle to write my journaling in. Added an enamel sticker, a flair and 2 little enamel x.


I like to add cards that I receive in my Project Life album. This here that you see is the enveloppe. I like how my daughter's teacher calls me Mrs T. when my name would really be Mrs C. lol But I find it funny that Mrs T makes me feel like a teacher. :) The little card is right behind the enveloppe. I let it peak a little up there. I added a small die cut to add a little detail about the card and attached all of this together with a paperclip (found at Target! Not included in the kit)


I made an Easter column with the 4 pockets far left of the page. These alphas are really powder or ice blue  but on yellow they turned kind of grayish. But it's ok. We're not looking for perfection, are we?

I used a technique that I really hate (!!!) which is writing directly on my photo with a slick marker. I hate it because I always feel like the ink has a yellow/orange flare to it. I also don't like it because I can,t seem to ever find the right way and place to write. I do like my handwriting and here I really didn't want to hide any of my picture with a label so I tried it again. Ali (Edwards) does it always perfectly. Me? Not sure... but anyway, it's there and it's good enough for this one time. :)


Lovely lovely PL cards in the kit this month. And I treated myself this month and bought the sprinkles kit in which I found these ADORABLE tiny stickers. I mean, look at this "love this". So cute!! The Dear Lizzy very cute and optimistic phrases, also in the sprinkles kit, are one of my favorite product EVER! Yay for Dear Lizzy!


The sprinkles kit again had some doilies. I like them to add a little touch of solid color through all these patterns of the Fancy Free collection. And paired with the embellishments from the PL and Embellishments kit, they are just perfect. :)


On my right page I used two very white cards to let the eye rest in the middle of all these patterns and colors!


My mom turned 67 when she was here. :) A pink cake! I didn't think that it would match the kit, I swear!! lol


I got a little over the top with creativity on this card. I wrote in circle and stitched 2 lines around my journaling. Added a small puffy heart in the middle. The card was so cute and simple, maybe I should have just let it be with the tiny heart in the middle. But you know how I love journaling and want to write everything. 


That little puffy LOL is so cute!!! Yay for simple and modern embellishments like this one! This little card is also simple and perfect!! So beautiful colors.


This die cut is silver foiled. Just beautiful. I didn,t capture it when I shot my pictures of my spread. And the ps I love you puffy sticker...again, I love it!!!!


I decided to use lots of colors behind this photo. Everything else was too plain and didn't work. So to tone it down, I used a navy blue no pattern fairly big sticker.  And the 4EVER... swoon. So sweet and simple. I still have plenty of these tiny puffy stickers left and they are ALL so so cute!!!

Have a great day my friends and thanks for stopping by!

Marie

Tuesday, May 10, 2016

Get It Scrapped DT | My dad

Hello everyone!

Here's a page I made for Get it Scrapped. The goal of the assignment this month was to scrap with an intention. Start with something (a photo, a story, an emotion, whatever) and build on that bringing only elements that makes sense and that convey the intention you started with.

Can you imagine that I hadn't made a page on my dad yet? Not one! So here is my first page I made for/about him.


So I started with the idea of making a page about my dad and everything on this page tells a bit of his story.


Starting with the title which is an inside joke in our family.


And all the embellishments too have their meaning.


The page is minimalist, just like my dad, and holds a lot of words, just like my dad.  :)


To see more on building pages with intention, head over to the Get it Scrapped blog where you'll find a great article and many more examples.

Marie

Sunday, May 8, 2016

Happy Mother's day!

Hi everyone!

Today I just wanted to pay a little tribute to my mom and 2 little girls who made me a mom.


This is in July 2010 when, the week Maya was born and made me a mom for the second time. I was lucky enough to have my own mom with me for several weeks (but it's never long enough!) and I couldn't be more thankful for that.

Today I'm looking back at all the things we have done together and these are the best memories ever! Cruises, travels in Europe, Disney, shopping trips, laughing till well, you know what! :)
Here's a little walk back memory lane. To many many more stories together!!!

 My wedding, July 2001

 Strassbourg, June 2006

 Zermatt, June 2006

 Cruise on the Carnival Glory, January 2007

Cruise on the Carnival Triumph, January 2005

 Disney, January 2007

Cruise on the Star Princess, January 2005

My mom was always there to help me through my struggles and to cheer on me and to listen to me and mostly to give me the advice that I should listen to my little voice inside my heart. Thank you so much for being the mom you are, Maman! I wouldn't have trade you for any other mom!! <3 nbsp="" p="">
Happy Mother's Day!!!

Saturday, May 7, 2016

Scrap Gals Guest Post | Happy national Scrapbooking Day

Hello everyone!!

Happy (inter-)National Scrapbooking Day!

If it's your first time on my blog, well hello, I'm very happy to have you here. :)  You'll see that my blog posts are filled with pictures and explanations!

Today I would like to show you a mini album I made for my mom's birthday. We live in 2 different countries and we don't get to see each other often enough so when my parents came last month, it was my mom's birthday and I thought that she would be happy to get a little book about her 2 weeks stay at our house. :)

I wanted the album to be sturdy so as a base I went with a little book I had on hand. I couldn't add pages like in a 3 rings binder but for a small project with a beginning and an end, it was perfect!

When I made the book I had just bought the beautiful Wilna Furstenberg's Spring Collection and I thought they would work perfectly with my project.  I started by printing and cutting lots of flowers with my Silhouette. Now, I know A LOT of you Silhouette owners have never tried the PRINT AND CUT function of your wonderful machine and you don't know what you are missing!!  So today I would love for you to follow these EASY and SIMPLE steps and to try it once and for all!! It's National Scrapbooking Day after all! :)

If you already know how to print and cut, just skip this part and go directly to the album sharing part! :D

Ok, so I assume that if you have a Silhouette,  and if it's out of it's box, you already know how to cut, right? So then you just have to learn how to PRINT. So easy!!!

1. Open your printable document and cut file.


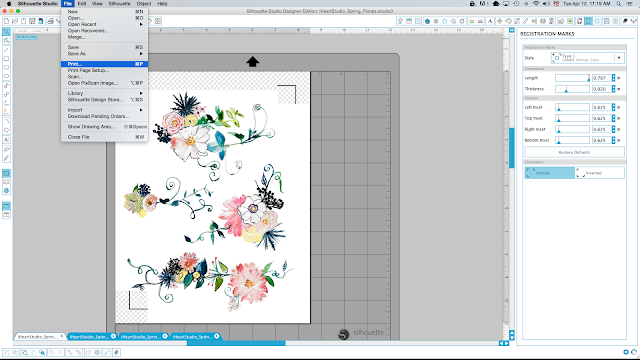
2 Turn on the PRINT guide (it's the icon to the top right of your screen with a page and 4 corners - you see it up here, highlighted in blue)

Then, in the STYLE box you want to select the Type One - Cameo/Portrait. You will see the grey area and the black square + corner lines appear on your document.

YOU'RE HALF WAY THERE! Hang on!


3. Once you have that grey area, you have to place your prints in the middle of your paper so that the image doesn't touch the grey area, like shown above.


4. When that's done, align the black cutting file with the printable as much as you can. When it looks pretty good, right click on the black image and bring it to the back.  You can then adjust the top image so that both shapes fit perfectly.


Just like this:


5. Now you are ready to print. I bring my black cutting guide to the front again (or the image to the back if you prefer) and I delete it (select + hit delete). Then you go to FILE and Print, just as you would print a normal document. You put your cardstock in your PRINTER (not your Silhouette). 


AND YOU MADE IT!!! Your image is printed with the cutting guides around it. You now only need to place your cardstock on your mat, making sure that you align the upper left cornet perfectly in the corner of the mat and you are ready to cut, as you would cut a normal shape.

If you need directions for the cutting part, here they are:

6. So now undo your last action (command or control Z), which was deleting your black cutting shape.  It will be exactly on top of the printed image.


7. Go to the Trace menu (which is the blue and yellow butterfly looking icon), click on "select trace area" and select the whole black image. It will turn yellow.


Once it's selected, uncheck the "high pass filter" box and the whole surface will turn yellow.


Click on "Trace" or "Trace Outer Edge" depending on if you want all the little inside parts cut out.


Delete both the black and the color images or just grab them and pull them to the side of the "work surface".


And finally select the "cut" icon which is the one that looks like a pen. Select your cardstock type and send it to Silhouette. Don't forget to insert your mat with your printed document in the machine first!

See, very easy!! Now, if you think you're going to forget all of this and want to come back to take another peek at the instructions, PIN this post to your favorite board or make a bookmark! :)

Now on to my mini album...

I ended up with 32 pages! yikes!!

Here's the little black book that I had on hand. I found it at Michaels in the clearance section many years ago! Although it's spiral bound and doesn't close properly with all the photos and embellishments I have in there, the faux-leather cover with the stitching details is really beautiful and it looks like pretty sturdy too.  The size of it is about 8x8in.


As an opening, I used a gold foiled label (Pretty Little Studio)  and wrote down a summary of what will be in the book. I added some paint splatters - they are actually acrylic ink from Liquitex - and I definitely should have tested them on a piece of paper before starting using them for the first time (!!) in my album. lol I don't like that big blob of ink at the bottom. This being said, I was on the lookout for white paint/ink that would cover well and this is it!!


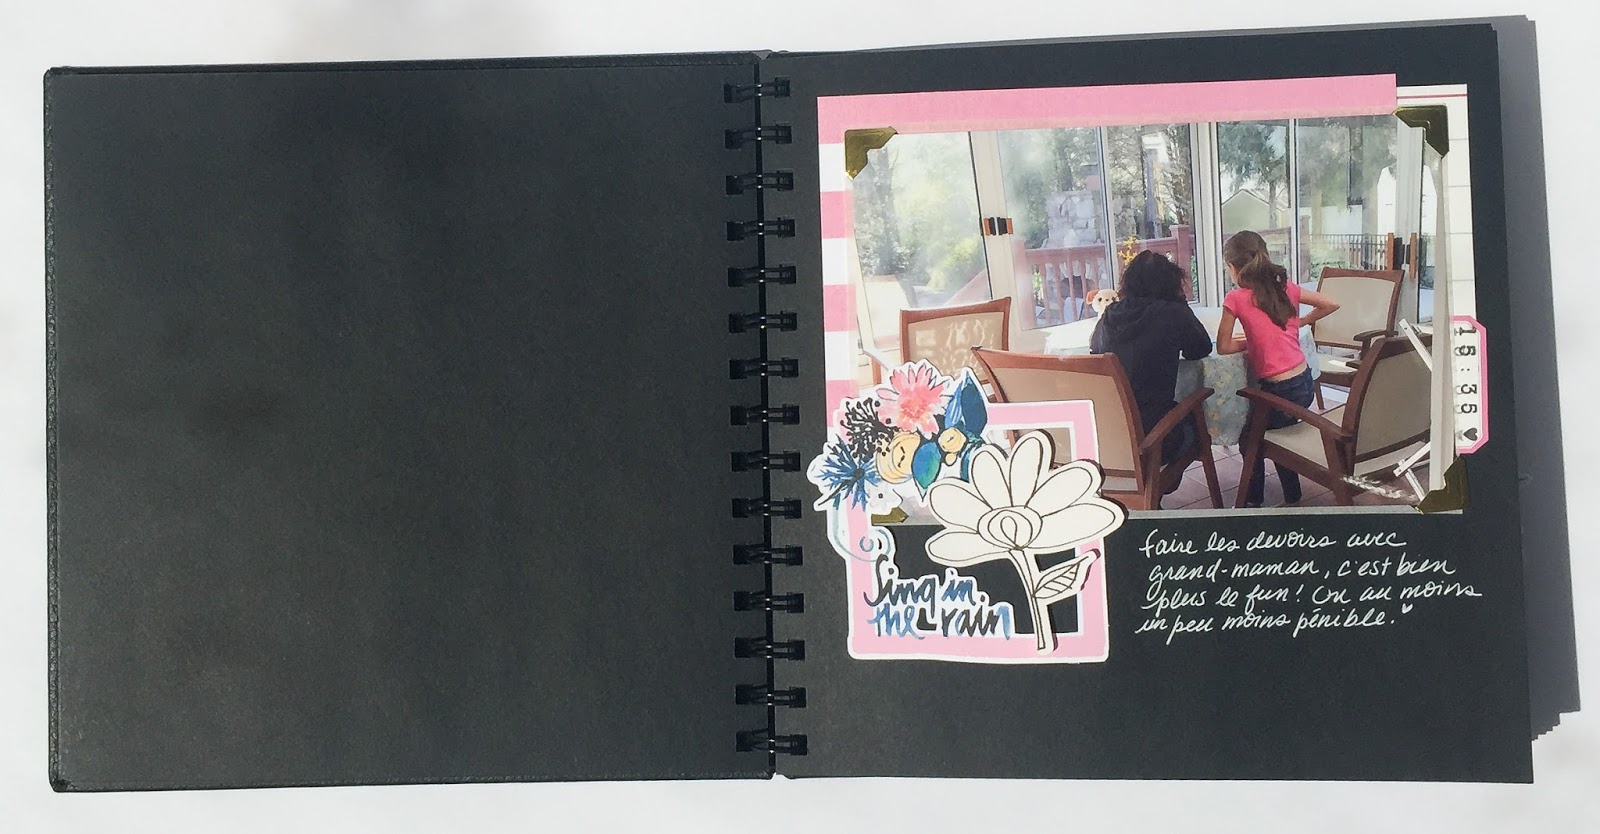
On the "real first page" I have the date and place as long as some personal words to my mom.


This teal label  (Pretty Little Studio) goes PERFECTLY with Wilna's flowers.


Behind the colored flowers, you will notice some black and white branches. They are also from Wilna. You can find them here.


I used some foam adhesive to make the words pop a little more.


I mainly used Wilna's printable and cut files throughout my whole album but on some pages I also added a little bit of paper and labels.


Here you can see Ali Edward's time stamp in action.


I added some more acrylic ink splatters throughout the album, but not on every page. And not a ton either.


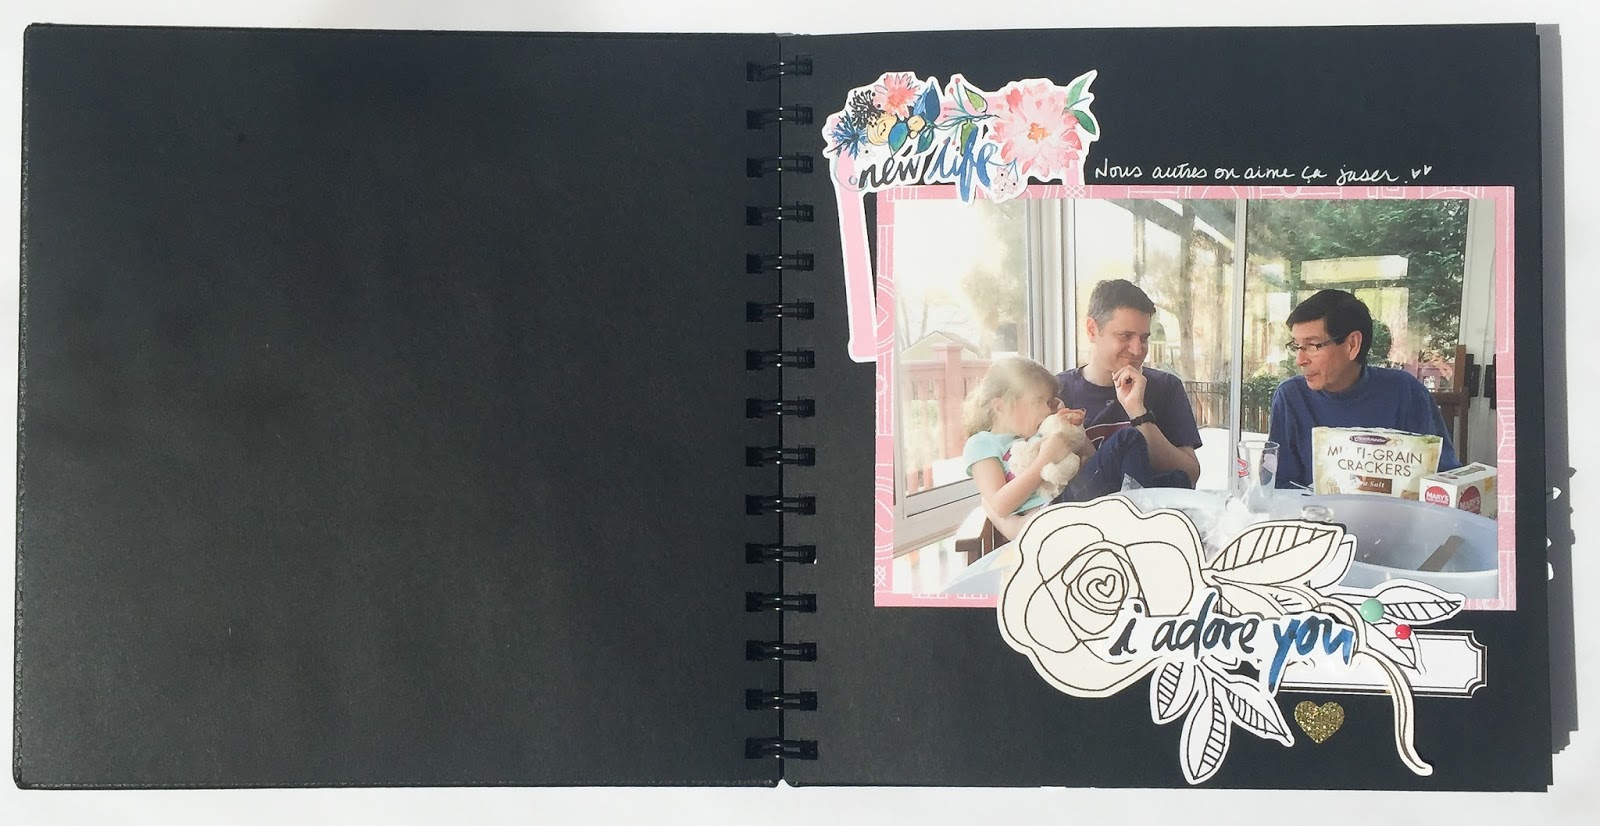
To mix things up I sometimes used photo corners and other times I used patterned papers to ground my photo. Here I used different patterns of Pretty Little Studio Gold mine papers.


I didn't do a double page layout on every page. And it's ok. It gives the reader little breathing room


I found that butterfly die cut in my stash, left from a previous project.


And I finished off the album with one last little note and a die cut. :)


Finally, a couple pages later I added this photo of when by brother came to visit. He left just on the day my parents arrived (so my mom wanted me to include it in the album)


VoilĂ , a quick little album made easy by using many die cuts from the same collection. Also, it helped that I had  an empty book to start with. No messing with a template or pocket pages.

Now, if you are still with me, my challenge to you today would be to use your Silhouette if you have one. If you're a first time user, start with a simple cut, but if you are used to the machine, I invite you to use the print and cut function, following my tutorial. If you don't have a Silhouette, you can still buy any print and cut product (I really really love the ones from Wilna Furstenberg) and print it + cut it by hand. Leave a little white space around the image and enjoy the cutting. :) 

I'd really love to see what my post inspired you to do so please please please tag me on Instagram (I'm MPCAPISTRAN)  if you do share a project!! :D 

Happy National Day again!! 
And thanks for stopping by. 

Marie