Showing posts with label Maya. Show all posts

Thursday, March 8, 2018

Pretty Little Studio | Welcome Home Maple

I can't believe I haven't blog since last October!!

But here I am with an awesome creation I made with my new Potpourri collection available at Pretty Little Studio!


Here's the whole page which was put together with 95% of products available in the Pretty Little Studio shop!! :) Let me break it down for you.


I used 3 pieces of paper: gold glitter (this is a must have in your paper collection! I adds a beautiful accent to any layout.), one colorful paper and a black and white paper, both found in the 8x8 Potpourri Paper Pack. The Combination of these 3 styles is perfect to give bling to my central photo!!

I stacked the papers on foam tape to leave some space to add small embellishments between the papers: leaves shape sequins (also from my Potpourri collection!), small star die cuts and some foiled die cuts in heart shape.


I've placed my photos on a diagonal and added the journaling in the space created by that line. I filled the small spaces with more label die cuts, stickers and wood veneer.


I the right space I loosely added leaves in a way that they look like they are falling. I sprinkled some sequins, playing with the colors and I added some stitching to add some more details.


At the very top of the page I have a large cluster of die cuts: large vellum leaves all stitched down with two lines of thread. I added a gold foiled banner on which I stamped my title in black ink. I adhered the banner with foam dots. Same thing for the speech bubble. I stitched all around the white heart in the middle of the speech bubble. Stitching is so easy with the sewing machine and it adds so much details!!! I added small wooden buttons and brads in the tones of the Potpourri collection.


Here's another perspective to see the dimension and the shimmer of the gold foil.


To sort of mat this first picture of the cascade, so that she doesn't go unseen, I added a colorful vellum leaf under it and a sticker and flair button on top of it. I then sprinkled some sequins. The check mark is really coll because it's simple shape and the fact that it is black and white is pulling from the black and white patterned paper I used under my main photo. Also the checkmark symbol is going hand in hand with my picture where my little one is checking the days that have passed and the ones left until she gets her biggie!.


On the far right, I added a fun cluster of die cuts, leaf sequin, wooden brad and wood veneer and a squirrel paperclip. Isn't it the cutest?!!

Also notice how I layered the pink label, left blank, under the gold foil banner. It just makes the banner pop even more.

I finally added a small chipboard piece, some word stickers  and more gold foil die cuts.


I've been asked how I use sequins on a page. I use them to highlight some groups of embellishments. Just like confettis. I like them way more than the enamel dots because they are sparkly! :)

I hope you liked my walk through!!

Talk to you soon with more beautiful layouts. I promise!!

Marie

Tuesday, October 4, 2016

Pretty Little Studio DT | Just Nick Studio

Hi everyone!

If you came over from the Pretty Little Studio Blog, WELCOME! You're at the right place and I'll explain to you how I did my title in just a minute. :)

If you are "just" my regular blog follower, WELCOME! I'm glad you are here. If you were not aware of this, Pretty Little Studio is doing a product swap with Just Nick Studio, which means that Pretty Little Studio's design team members were given some Just Nick Studio products to play with and the Just Nick Design team members were given some Pretty Little Studio products to work with. If you are not familiar with these companies, I invite you to check them out! They are but full of greatness! I also invited to visit our two blogs all week to get some great inspiration from both teams. :)


Here is the page I made using the Here Comes the Sun Collection from Pretty Please (that's me! :) ) for Pretty Little Studio and the Up in the air and Script Font from Just Nick Studio. 


For more detailed shots and some indications of how I made the layout, head over to the Pretty Little Studio blog please. I am here going to show you how to make this title from the Script Font cut file using Photoshop.


1. OK, so first of all, open the cut file in Photoshop. You will get all the letters on one layer and on a white background.


2. Erase the background using the magic eraser (it's the one with the star on it). Erase all the white spaces inside the letters too. You are now ready to use each letter individually. You should save this file in your cut file library so that you don't have to do these steps again overtime you want to use it. 


3. Open a new empty document. Make sure the background is clear. 


4. Go back to your document with the letters and select the one you want with the section tool (it looks like a rectangle with a doted line). Once it's selected, press control+C or command+C on a mac and then go back to your empty document and press control+V or command+V. 


5. Using the eraser, erase all the black lines that you don't want. Repeat this process for every letters you need to write your word or phrase.


6. Resize and arrange you letters until you are satisfied with your word art and save it as a .png file.

You are now ready to cut it out with your Silhouette! It takes a little bit of time, but the result is great! You can mix up script font titles with square letter stickers or with any other letters for a fabulous look! 


Thanks for coming by and happy creating!!!!

Marie-Pierre 
SaveSaveSaveSaveSaveSave

Tuesday, June 7, 2016

Get It Scrapped DT | the details

Hi everyone!!

Today I am sad to announce that this is my LAST project as a Get it Scrapped DT member. With the upcoming move, it was impossible for me to stand the rhythm and I also didn't want to promise that I'd be back in three month since I have NO idea of when I'll be settled in and when the girls will get used to their new environnement. They might need me a lot for the first months and I want to be there for them. So after 4 beautiful years alongside Debbie (Hodge) and Amy (Kingsford), here I am posting my very last project. *holding my tears


So the last assignment was to scrapbook a photo with details. I chose to go with a picture of Maya's 5 year old cake because as we were working on our cakes for this year we realized we had a hard time remembering our cakes we make each year. So I chose 3 photos. One showing me with Maya and her cake, one showing the whole cake and one even closer showing even more details of the cake.


I added elements around the pictures that wouldn't steal the show.


VoilĂ !!
Thanks so much Get it Scrapped!
I will miss you very very very much!!!

Marie

Monday, November 16, 2015

Citrus Twist Kits | When I grow up

Hi everyone!

Here's my last page using the November 2015 Citrus Twist Kits Add-on kit. :)


Sometimes, we really have to not get caught up by with the kit is supposed to be. A baby kit? yes, ok. But you can use it for lots of other things! Focs on the colors and patterns. This little apple was perfect to make a school layout. And the yellow in the kit was perfect to go with my pictures of Maya graduating.


Just changing the colors you are using can make a huge difference in the end result. No baby pink on this page. :) But I could still used these vellum stars. In white.


And I gathered everything that was red. Even that tiny strip of red paper can make a big impact on the page.


Add some black to make everything pop and to make the layout look strong.


And layer, layer, layer. And stitch!! That's my secret :)

That's it for my take on the Add-on kit. I hope you enjoyed it.
Talk to you again soon!!

Marie

Tuesday, November 4, 2014

Get it Scrapped - Big circles

Hi everyone!

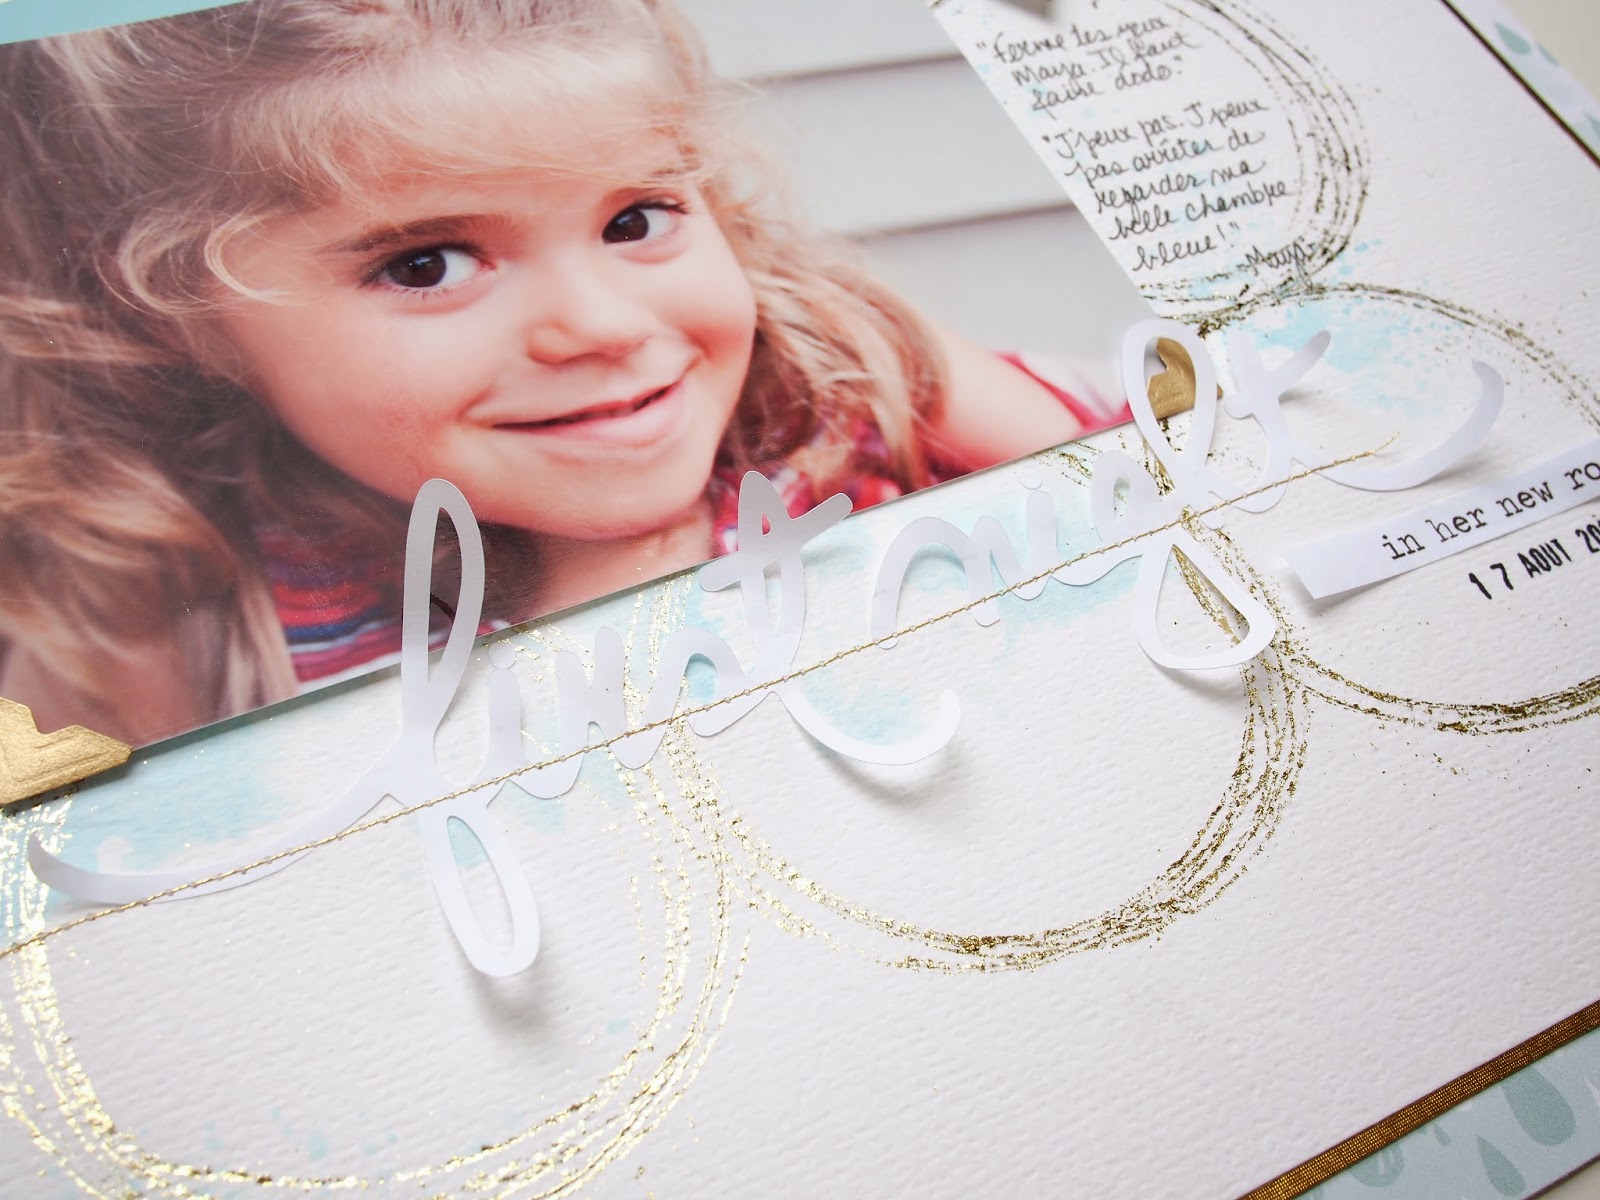
Today I'm very happy to show you a page I made a little while ago for Get it Scrapped. The challenge was to incorporate a large circle pattern to a layout. I'm not a circle fan. Seriously. If you go through my pages, you'll find very few circles. So I had to think a little before I came up with something original and striking! I finally came to the idea that I wanted some gold foil transfer. A little bit like I did on this page:

Salut tout le monde!

J'suis vraiment contente aujourd'hui parce que je peux vous montrer une page que j'avais vraiment hâte de vous montrer!! Je l'ai faite pour Get it Scrapped et le dĂ©fi Ă©tait d'utiliser de grands cercles. J'suis pas une super fan des cercles. J'en utilise très très rarement sur mes pages!! Donc j'ai dĂ» me creuser la tĂŞte pas mal pour trouver une idĂ©e qui allait sortir de l'ordinaire! :) Puis j'ai soudain eu envie de faire des cercles en utilisant de la feuille d'or. Un peu comme j'avais fait sur cette page-ci:


And I thought that If I would place all my circles next to another, they could almost look like a square….. lol so anyway, I started by tracing some very large circles with the help of a round metal tin. The way I did it is by scribbling with a pencil on the side if the tin.
Et Ă  force d,y penser, je me suis dit que si je mettais tous mes cercles cĂ´te Ă  cĂ´te, Ă§a me donnerait quelque chose qui ressemblerait Ă  un carrĂ©. ;) Alors j,ai trouvĂ© cette petite boite en mĂ©tal et je me suis dit que Ă§a serait la grandeur idĂ©ale. Je pouvais me faire un "carrĂ©" de 3x3 cercles. Pour les tracer sur ma feuille, j'ai gribouillĂ© avec un crayon de plomb sur le cotĂ© de la boĂ®te...


And then I touched the paper with the tin. It made a transfer pretty easily.
Puis je l'ai pressĂ©e sur mon papier. 


I then used a glue pen and traced loosely around the circles. I wanted to have several circles on each traced circle, if that makes sense.
J'ai ensuite utilisé un crayon de colle pour tracer sur les cercles. Je voulais plusieurs lignes pour chaque cercle. J'y suis allée à main levée, sans trop faire attention.


I waited a minute or two and then I started adhering the foil onto the glue by pressing several times.
J'ai ensuite attendu quelques minutes que la colle sèche et j,ai adhĂ©rĂ© la feuille d'or en la pressant sur la colle. 


The look is totally imperfect and that's exactly what I was going for. The important thing for me was that it's shiny. :)
Ca donne un look tout Ă  fait imparfait et c'est ça que je voulais! En fait, ce qui Ă©tait important pour moi c'est que Ă§a soit brillant.


And I started with this background to make my layout. Here is the finished page:
Puis je suis partie avec ce donc pour faire ma page:


The story is about my daughter's blue bedroom that she wanted in the new house. The first night that we slept at the house, I told her to close her eyes to go to sleep and she told me: "I can't. I can't stop looking at my beautiful blue room."
L'histoire de la page c'est que lorsqu'on a couché dans notre nouvelle maison pour la première fois, J,ai dit à ma fille de fermer ses yeux pour qu'elle puisse s'endormir et elle m'a répondu: "J'peux pas. J'peux pas arrêter de regarder ma belle chambre bleue!"

I wanted the page to be really soft so that the blue of the pant chip would pop out.
Je voulais que ma page soit vraiment douce pour que le bleu de mon Ă©chantillon de peinture ressorte.


I was so happy to use my new embellishments from the gold foil kit from Heidi Swapp!!! They are just GORGEOUS!!
J'Ă©tais vraiment heureuse d'utiliser mes nouveaux embellissements dorĂ© du nouveau kit de Project Life de Heidi Swapp. Ils sont vraiment beaux!!! Tellement que je suis allĂ©e m'en acheter 3 autres kits. ;)


I hand wrote my title and cut it out on white copy paper with my Silhouette. I stitched it in place with some gold thread.
J'ai écrit mon titre à la main et je l,ai découpé avec ma Silhouette dans du papier blanc à photocopie. Je l'ai cousu en place avec du fil doré.


I'm very please with the circle background! I used one of the circle to house my journaling. With the tiny diamond, it's just so perfect!
Je suis vraiment contente de mon fond de cercles dorés. J'ai même utilisé un des cercles pour écrire mon texte. Avec le petit diamant juste au dessus, c'est juste parfait. :)


I made the watercolor behind the picture using some ink and water.
J'ai fait mon fond style aquarelle avec de l,encre et de l'eau, tout simplement. 


VoilĂ . I love this page and was eager to show it to you!! :) I hope I could inspire you in some way.
VoilĂ ! J'espère avoir pu vous inspirer un peu aujourd'hui. :) J'adore ma page et j'avais vraiment hâte de vous la montrer. :)

Talk to you soon!!
Ă€ bientĂ´t!!!

Marie-Pierre

Wednesday, October 29, 2014

Magie - a new layout

Hi everyone,
I have another page to show you today. 
Salut tout le monde,
j'ai une autre page pour vous ce matin.


Do you remember that die cut I designed not too long ago? Well I wanted to use it on a Christmas layout but I thought I'd rather use it now on this page before I forget about it or worst, I forget were I stored it! There's just something about gold foil!! And man, to have my own hand writing like this on a page is the reason why I bought my Silhouette and I love it when I take the time to design beautiful things and put my Silhouette to work.
Vous souvenez-vous que j'ai créé ce die cut il n'y a pas longtemps? J'avais l'intention de l'utiliser sur une page de NoĂ«l, mais je me suis dit que j'Ă©tais aussi bien de l'utiliser maintenant avant d'oublier que je l'ai, ou pire encore, avant d'oublier oĂą je l'ai mis!! J'adore le dorĂ©! Et j,adore aussi de voir mon Ă©criture comme ça sur une page! C'est exactement pour faire ça que je me suis procurĂ©e la Silhouette au dĂ©part alors quand je prends le temps de crĂ©er et de faire des belles choses avec, ça me rend super heureuse. :)


This little frame from Freckled Fawn! I was hoarding it!! I loved it so much that I wanted to keep it for the perfect occasion. THIS, for me, was the perfect occasion. :)
Ce petit cadre en bois est de Freckled Fawn. Je le gardais pour une occasion spéciale. Elle est enfin arrivée. :)

Inside the frame I used very pale patterned paper from Dear Lizzy and I wrote with a quill and gold ink. You can't really see the shimmer here but it is simply gorgeous!
Puis dans le cadre j'ai mis un morceau de papier  motifs très très pâle sur lequel j'ai Ă©crit avec une plume et de l'encre dorĂ©. Vous ne pouvez pas vraiment le voir sur la photo, mais ça brille. C'est vraiment beau.


I layered a beautiful chipboard accent from Heidi Swapp and layered all of this on a card from the Heidi Swapp Glitter add-on kit. The black and white flowers are print and cut files from the great Wilna Furstenberg. I painted the middle of the flower with the same shimmery golden ink I used to write in the frame.
Puis j'ai ajouté ce beau petit diamant de Heidi Swapp et derrière j,ai mis une carte toute brillante du nouveau mini-kit de Heidi Swapp. Les fleurs en noir et blanc sont de la fabuleuse Wilna. C'est un fichier print and cut. J'ai peinturé le centre de la fleur avec de l'encre doré, la même que celle avec laquelle j'ai écrit dans le cadre.


Here, a small clip to hold the picture and some labels, stickers and wooden pieces.
Oh and for this page I also broke my golden polka dot vellum I just bought a couple of weeks ago! It's a "favorite product" layout.
Ici, une petite pince en bois qui tient la photo et des petites étiquettes. Puis derrière ma photo j'ai mis du vélin avec des gros points dorés. Je l'adore!!! On pourrait appeler cette page "la page de tous mes produits préférés". :)


Here you can see some more layering of beautiful embellishments.
Encore plus de beaux embellissements.


So, what do you think?  :)
I sure had fun creating this page. And I love it! :)
Talk to you soon,

Alors, vous en pensez quoi?
En tous cas j,ai eu beaucoup de plaisir à créer cette page. Et je l'aime beaucoup. :)
Ă€ bientĂ´t!! 

Marie