If you came over from the Pretty Little Studio Blog, WELCOME! You're at the right place and I'll explain to you how I did my title in just a minute. :)
If you are "just" my regular blog follower, WELCOME! I'm glad you are here. If you were not aware of this, Pretty Little Studio is doing a product swap with Just Nick Studio, which means that Pretty Little Studio's design team members were given some Just Nick Studio products to play with and the Just Nick Design team members were given some Pretty Little Studio products to work with. If you are not familiar with these companies, I invite you to check them out! They are but full of greatness! I also invited to visit our two blogs all week to get some great inspiration from both teams. :)
 |
Here is the page I made using the Here Comes the Sun Collection from Pretty Please (that's me! :) ) for Pretty Little Studio and the Up in the air and Script Font from Just Nick Studio.
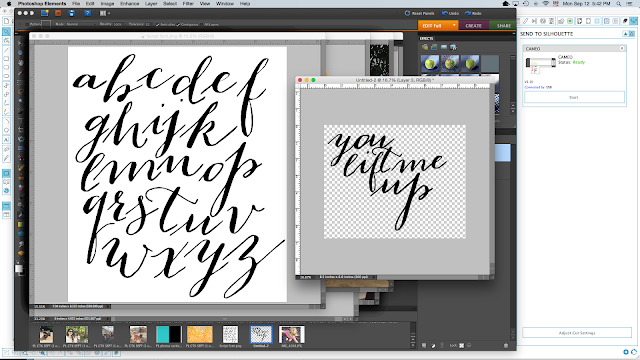
For more detailed shots and some indications of how I made the layout, head over to the Pretty Little Studio blog please. I am here going to show you how to make this title from the Script Font cut file using Photoshop.
1. OK, so first of all, open the cut file in Photoshop. You will get all the letters on one layer and on a white background.
2. Erase the background using the magic eraser (it's the one with the star on it). Erase all the white spaces inside the letters too. You are now ready to use each letter individually. You should save this file in your cut file library so that you don't have to do these steps again overtime you want to use it.
3. Open a new empty document. Make sure the background is clear.
4. Go back to your document with the letters and select the one you want with the section tool (it looks like a rectangle with a doted line). Once it's selected, press control+C or command+C on a mac and then go back to your empty document and press control+V or command+V.
5. Using the eraser, erase all the black lines that you don't want. Repeat this process for every letters you need to write your word or phrase.

6. Resize and arrange you letters until you are satisfied with your word art and save it as a .png file.
You are now ready to cut it out with your Silhouette! It takes a little bit of time, but the result is great! You can mix up script font titles with square letter stickers or with any other letters for a fabulous look!
Thanks for coming by and happy creating!!!!
Marie-Pierre


2 comments:
Gorgeous!
Thank you!!!! Thanks for your comment too! :)
Post a Comment